How to Root Samsung Galaxy J2 Prime - The Samsung Galaxy J2 Prime is the cheapest variant of the J Prime series released in Indonesia. Although the cheapest, but the appearance of this phone still looks elegant especially with unibody construction, the side view looks more "clean".
You can remove the back cover to simply remove the battery or insert two micro sims or just add storage space by inserting a microSD card. The appearance of this phone has a metallic pattern and coupled with a metal frame around the body makes it more beautiful to look at.
The form of J2 Prime is reminiscent of Galaxy Prime, the placement of volume buttons, camera power, and speaker are very precise. But because of this also the grip of the cellphone becomes even more comfortable even though using one hand. The front of this phone has several sensors, a front camera, and a home button and a menu and back typical of Samsung.
The screen itself measures 5 inches with a resolution of 540p HD, with this resolution, the display of this cell phone looks not optimal. Moreover, the absence of Super AMOLED technology has made it even worse, making the screen less sharp and clear.
However, there are some improvements from the original J2 version, including the chipset which uses 64-bit Mediatek MT6737T this time. The processor can run with a maximum speed of 1.4 GHz and is supported by Mali-T720MP2 GPU.
Other changes are in RAM, this time being more relieved, that is 1.5GB and an Android version that already uses version 6.0, aka Marshmallow. While from the side of the camera, Samsung embeds a resolution of 8 MP on the back and 5 MP on the front, both cameras are supported with LED flashlights.
But unfortunately this phone's internal memory is fairly small, only 8GB and that too, which can be used by users is only about 3GB. As a result, my friend can not be free to save games or other applications. Samsung provides the KNOX feature here, this feature is useful for protecting data and increasing cell phone security.
Then there is also a Secure Folder to lock data/applications. Even Samsung also added Microsoft applications such as Excel, Powerpoint, and others for free here. In terms of the battery itself, this phone is equipped with a battery capacity of 2600 mAh which is only used for half a day.
Because Samsung Galaxy J2 Prime already supports to be able to open the bootloader, finally this smartphone also has its own TWRP version. And TWRP here is the TWRP version made by one of
If TWRP is installed correctly then the root process is very easy to do.
This time you have to go into recovery mode to root, first turn off your Samsung Galaxy J2 Prime cell phone, then press and hold the home + power + volume up button until you enter recovery mode like the TWRP display in the picture above.
If so, then give TWRP permission to modify the system, afterwards select "Install" then look for the SuperSU file that you have downloaded and put it in memory earlier. Once found, select the file and swap the screen to the right on "Swipe to Confirm Flash" to start the SuperSU flash process. Swipe to confirm flash
Wait a while until the process ends then press the back button and restart. To make you even more sure, you can download the Root Checker application in the Play Store to check whether your Samsung Galaxy J2 Prime has been successfully rooted.
How to Root Samsung Galaxy J2 Prime without TWRP
Now you can also root Samsung Galaxy J2 Prime without using TWRP, and the required conditions are
While the way is very simple, namely:
Activate OEM as above.
Enter download mode (Power + Home + Volume down).
Then plug the phone into a PC using a USB cable.
Open Odin with Run Admin.
Click AP, select the AutoRoot file and click start.
After the flash finishes, reboot and wait for the phone to turn on ...
And finished, your Galaxy J2 Prime smartphone has been successfully rooted.
To make it even more convincing, you can download the Root Checker application through the Play Store.
To root the Samsung Galaxy J2 Prime without using a PC, you need the help of an application called Kingroot. Kingroot has been trusted for success in rooting a variety of devices that previously failed in the root. More importantly, you can get this application for free.
Advertisement
To install Kingroot, you must first activate the "Unknown Source" in the settings, the way is to open the settings then select security and activate the unknown source (unknown source).
1. Once it's activated, download Kingroot immediately on its official website at https://kingroot.net/
2. After the download is complete, install Kingroot as usual on the cellphone and then open it after installation.
3. Then press "Start root" or "Fix now" to start the root process. Start the root process
4. Wait a few moments until the process for root is 100% complete. If it is successful, there will be a notification that indicates that the root process has been successful.
Advertisement

5. To make you even more sure, try downloading the Root Checker application in the Play Store to check the validity of the root.
That's how to root Samsung Galaxy J2 Prime and also how to install TWRP. See you in my next article.
You can remove the back cover to simply remove the battery or insert two micro sims or just add storage space by inserting a microSD card. The appearance of this phone has a metallic pattern and coupled with a metal frame around the body makes it more beautiful to look at.
The form of J2 Prime is reminiscent of Galaxy Prime, the placement of volume buttons, camera power, and speaker are very precise. But because of this also the grip of the cellphone becomes even more comfortable even though using one hand. The front of this phone has several sensors, a front camera, and a home button and a menu and back typical of Samsung.
The screen itself measures 5 inches with a resolution of 540p HD, with this resolution, the display of this cell phone looks not optimal. Moreover, the absence of Super AMOLED technology has made it even worse, making the screen less sharp and clear.
However, there are some improvements from the original J2 version, including the chipset which uses 64-bit Mediatek MT6737T this time. The processor can run with a maximum speed of 1.4 GHz and is supported by Mali-T720MP2 GPU.
Other changes are in RAM, this time being more relieved, that is 1.5GB and an Android version that already uses version 6.0, aka Marshmallow. While from the side of the camera, Samsung embeds a resolution of 8 MP on the back and 5 MP on the front, both cameras are supported with LED flashlights.
But unfortunately this phone's internal memory is fairly small, only 8GB and that too, which can be used by users is only about 3GB. As a result, my friend can not be free to save games or other applications. Samsung provides the KNOX feature here, this feature is useful for protecting data and increasing cell phone security.
Then there is also a Secure Folder to lock data/applications. Even Samsung also added Microsoft applications such as Excel, Powerpoint, and others for free here. In terms of the battery itself, this phone is equipped with a battery capacity of 2600 mAh which is only used for half a day.
Note: Read to the end of every sentence or every way before applying it on your Samsung Galaxy J2 Prime, because I am not responsible for everything that might happen on your smartphone. Do With Your Own Risk.
This root and flash method will remove the warranty from your smartphone, so think carefully before executing it
How to Install / Flash TWRP on Samsung Galaxy J2 Prime
Because Samsung Galaxy J2 Prime already supports to be able to open the bootloader, finally this smartphone also has its own TWRP version. And TWRP here is the TWRP version made by one of
.
TWRP Display
TWRP itself is a custom recovery for Android that can be used to install / flash ROM, boot image and others into your smartphone, simply you can make any modifications to the Android operating system.
You can also root through this TWRP, so if your smartphone already supports and installed TWRP or other custom recovery, then your smartphone will almost certainly be rooted.
But first, prepare the following ingredients first:
Download and extract the Odin3_v3.12.5 application
Download the Samsung USB Driver then install it like you would any other application, if you restart the computer / laptop, friend.
Download the TWRP file for the SM-G532G
Also download SuperSU Root and place the file in the phone's memory, whether internal or external doesn't matter. It is better to place the files in each - internal and external, just in case.
In addition to these materials, also make sure that the USB cable is available and that the battery capacity of the Samsung Galaxy J2 Prime is more than 50%. If all of the above has been fulfilled by my friend, then we can continue this tutorial.
To enable OEM Unlocking, you must first activate the developer options mode. The trick is very easy, just open "Settings"> "About Phone". Then tap or press seven times the "Build Number" (Name Formation) until there is a small notification that the developer options are active.
After that, you open Settings again, and scroll down to find Developer options. Open the Developers options and look for OEM Unlocking then activate it then search and activate USB Debugging as well.
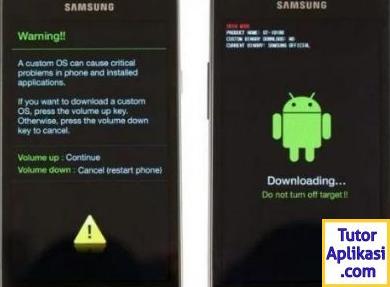
Next, you have to go into download mode, first turn off your Samsung Galaxy J2 Prime cellphone. Then press and hold the home + power + volume down simultaneously until the download mode screen appears as below. Then press the volume button up to enter into downloading mode.
TWRP itself is a custom recovery for Android that can be used to install / flash ROM, boot image and others into your smartphone, simply you can make any modifications to the Android operating system.
You can also root through this TWRP, so if your smartphone already supports and installed TWRP or other custom recovery, then your smartphone will almost certainly be rooted.
But first, prepare the following ingredients first:
Download and extract the Odin3_v3.12.5 application
Download the Samsung USB Driver then install it like you would any other application, if you restart the computer / laptop, friend.
Download the TWRP file for the SM-G532G
Also download SuperSU Root and place the file in the phone's memory, whether internal or external doesn't matter. It is better to place the files in each - internal and external, just in case.
In addition to these materials, also make sure that the USB cable is available and that the battery capacity of the Samsung Galaxy J2 Prime is more than 50%. If all of the above has been fulfilled by my friend, then we can continue this tutorial.
1. Activate OEM Unlocking
To enable OEM Unlocking, you must first activate the developer options mode. The trick is very easy, just open "Settings"> "About Phone". Then tap or press seven times the "Build Number" (Name Formation) until there is a small notification that the developer options are active.
After that, you open Settings again, and scroll down to find Developer options. Open the Developers options and look for OEM Unlocking then activate it then search and activate USB Debugging as well.
2. Enter Downloading Mode
Next, you have to go into download mode, first turn off your Samsung Galaxy J2 Prime cellphone. Then press and hold the home + power + volume down simultaneously until the download mode screen appears as below. Then press the volume button up to enter into downloading mode.
Display download mode
Plug in the Samsung Galaxy J2 Prime, my friend who has entered the downloading mode earlier to the computer using a USB cable. Then extract the downloaded Odin file and open Odin by right-clicking then selecting "Run Administrator".
After Odin opens, wait a moment until Odin recognizes your Samsung Galaxy J2 Prime's cellphone. Just look at the left Odin, if there is an inscription "Added" it means that your Galaxy J2 Prime has been read correctly. But if it's not there, it's likely that the Samsung driver isn't installed properly or worse, you forgot to install it.
3. Flash File TWRP
Plug in the Samsung Galaxy J2 Prime, my friend who has entered the downloading mode earlier to the computer using a USB cable. Then extract the downloaded Odin file and open Odin by right-clicking then selecting "Run Administrator".
After Odin opens, wait a moment until Odin recognizes your Samsung Galaxy J2 Prime's cellphone. Just look at the left Odin, if there is an inscription "Added" it means that your Galaxy J2 Prime has been read correctly. But if it's not there, it's likely that the Samsung driver isn't installed properly or worse, you forgot to install it.
The cell phone was successfully detected by Odin
I assume your Galaxy J2 Prime has been detected at Odin. Then click AP and look for the TWRP file that was downloaded earlier. After that, click Start to begin the process of installing TWRP into the Samsung Galaxy J2 Prime.
Wait a minute, if all is successful there will be a "PASS" message in Odin and if it fails there is a "Failed" message. If my friend fails, then most likely the downloaded TWRP file was corrupt, then try downloading the steps as above again.
The flash process was successful
Note: Before performing the root process, it is advisable that the friend perform Full Backup using TWRP first in case the data contained in the Samsung Galaxy J2 Prime is lost.
Note: Before performing the root process, it is advisable that the friend perform Full Backup using TWRP first in case the data contained in the Samsung Galaxy J2 Prime is lost.
How To Root Samsung Galaxy J2 Prime
If TWRP is installed correctly then the root process is very easy to do.
This time you have to go into recovery mode to root, first turn off your Samsung Galaxy J2 Prime cell phone, then press and hold the home + power + volume up button until you enter recovery mode like the TWRP display in the picture above.
If so, then give TWRP permission to modify the system, afterwards select "Install" then look for the SuperSU file that you have downloaded and put it in memory earlier. Once found, select the file and swap the screen to the right on "Swipe to Confirm Flash" to start the SuperSU flash process.
Swipe to confirm flashWait a while until the process ends then press the back button and restart. To make you even more sure, you can download the Root Checker application in the Play Store to check whether your Samsung Galaxy J2 Prime has been successfully rooted.
How to Root Samsung Galaxy J2 Prime without TWRP
Now you can also root Samsung Galaxy J2 Prime without using TWRP, and the required conditions are
- Download the Samsung USB Driver then install it like you would any other application, if you restart the computer / laptop, friend.
- Download the Odin3_v3.12.5 application
- Download file AutoRoot SuperSU J2 Prime
- Activate OEM Unlock as above.
- Backup all data in the cellphone because later the data will be deleted in this process.
While the way is very simple, namely:
Activate OEM as above.
Enter download mode (Power + Home + Volume down).
Then plug the phone into a PC using a USB cable.
Open Odin with Run Admin.
Click AP, select the AutoRoot file and click start.
After the flash finishes, reboot and wait for the phone to turn on ...
And finished, your Galaxy J2 Prime smartphone has been successfully rooted.
To make it even more convincing, you can download the Root Checker application through the Play Store.
How to Root Samsung Galaxy J2 Prime Without a PC
To root the Samsung Galaxy J2 Prime without using a PC, you need the help of an application called Kingroot. Kingroot has been trusted for success in rooting a variety of devices that previously failed in the root. More importantly, you can get this application for free.
Advertisement
To install Kingroot, you must first activate the "Unknown Source" in the settings, the way is to open the settings then select security and activate the unknown source (unknown source).
1. Once it's activated, download Kingroot immediately on its official website at https://kingroot.net/
2. After the download is complete, install Kingroot as usual on the cellphone and then open it after installation.
3. Then press "Start root" or "Fix now" to start the root process.
Start the root process4. Wait a few moments until the process for root is 100% complete. If it is successful, there will be a notification that indicates that the root process has been successful.
Advertisement
5. To make you even more sure, try downloading the Root Checker application in the Play Store to check the validity of the root.
That's how to root Samsung Galaxy J2 Prime and also how to install TWRP. See you in my next article.